


Have Questions?
-
Guaranteed Fitment
Always the correct part
-
In-House Experts
We know our products
-
Added Value
Mounting, Balancing
-
Wordwide Delivery
Free shipping on all orders
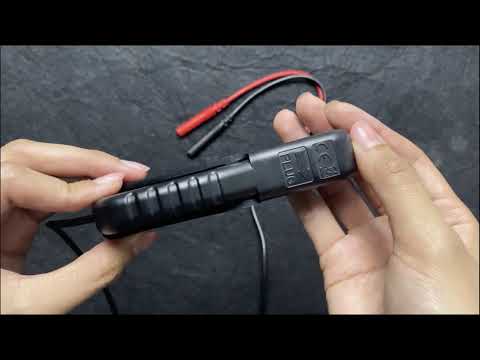
BTMETER BT-705A Signal Pick-up Inductive Clamp Lead, Measure Tach Range 600 RPM ~ 12000 RPM
PRODUCT DESCRIPTION
★【Important Note】This Signal Pickup needs to be used with multimeter or oscillograph for tach RPM measurement for vehicle...


PRODUCT DESCRIPTION
★【Important Note】This Signal Pickup needs to be used with multimeter or oscillograph for tach RPM measurement for vehicle engine. It’s recommend to use it with BTMETER BT-770K, BT-90K, BT-6688D automotive multimeter.
★【Great Companion to Automotive DMMs】 Features with standard 3/4 inch banana plugs, which means makes it compatible with most automotive meters that features with signal input.
★【Inductive Pickup Leads for BT-770K BT-90K】Perfectly work with BTMETER automotive multitester, such as: BT-770K, BT-90K, BT-6688D. To measure secondary end conductors of high voltage ignition coil spark .
★【Easy to Use】Clamp the spark plug wire with the mark ”→“ on the inductive pickup tool pointing to the spark plug for engine speed measurement.
★【Notice in Measurement】The distance between the spark plug and the clamp of the instrument must be less than 3.93 inch (10cm) during test, and the ignition frequency of the engine ignition system must be between 10Hz and 400Hz.
BTMETER BT-705A Inductive Signal Pick Up Clamp
• The signal pickup lead is professionally designed for adjustment and diagnosis of automotive engine, and it can be used with oscillograph or multitester to measure frequency or tach rpm.
• BT-705A pickup kit needs to work with digital multimeter features with signal input and capable of measuring parameters of vehicle engine systems.
• Adapting standard banana plug of 3/4 inch, inductive clamp is compatible with most multimeters with signal input functions. It work perfectly with BT-770K, BT-90K, BT-6688D automotive multitesters.
Features:
♦ Tach Measuring Range: 600RPM ~ 12000RPM
♦ Detection Mode: Magnetive Induction Measurement
♦ Applicable Engine: Spark Plug Igintion Gasoline Engine
♦ Detection Site: Secondary End Conductors of High Voltage Ignition Coil
Operating Instruction
1. Connect the clamp of the instrument to a spark plug wire with the mark ”→ “ on the instrument pointing to the spark plug.
2. Connect the plugs of the instrument to the input terminals of the automotive meter (The black plug of this instrument should be connect to “COM” jack of the automotive meter)
3. Set the automotive meter in corresponding measuring range.
4. Read the valve on the LCD display. If no reading is received, unhook the clamp, turn it over and connect again.
7 Days free refund, 15 Days free replace, 365 Days Warranty, Lifetime Tech-support.
